
Modern games are bigger than ever, and if you’re running out of space on your PlayStation 5, there’s a simple solution: add an M.2 NVMe SSD. Sony designed the PS5 with a dedicated expansion slot, so you aren’t replacing your existing storage - you’re adding more. That means no need to redownload everything from scratch. Best of all, installing an M.2 SSD that meets Sony’s specifications and is installed correctly will not void your warranty.
PB Tech makes the upgrade super easy. If you’re ready to upgrade, you can shop all PS5-compatible SSD options (with heatsinks included) in PB Tech’s PlayStation store.
Why Upgrade?
Once installed, an M.2 SSD lets you:
- Download, copy, and launch games directly from the new drive.
- Move games freely between internal storage, USB extended storage, and your SSD.
- Enjoy faster load times and more space for your growing library.
What You Will Need (apart from the SSD)
Before you start:
- A well-lit workspace and a table or flat surface to work on.
- A number one Phillips or cross-head screwdriver.
- Optional
- A small flashlight.
- A soft cloth to place the console on.


M.2 SSD Requirements for PS5
The easiest way to get a compatible SSD is to shop PB Tech PS5 ready SSDs, which include heatsinks and meet all the requirements. If you’re still curious though, let’s check out what those spec requirements are.
Interface: PCIe Gen4 x4 M.2 NVMe SSD
Socket type: Socket 3 (Key M)
Speed: 5500 MB per second or faster recommended
Capacity: 250 GB to 8 TB
Cooling: must have a cooling structure, such as a heatsink
Form factor: M.2 type 2230, 2242, 2260, 2280, or 22110
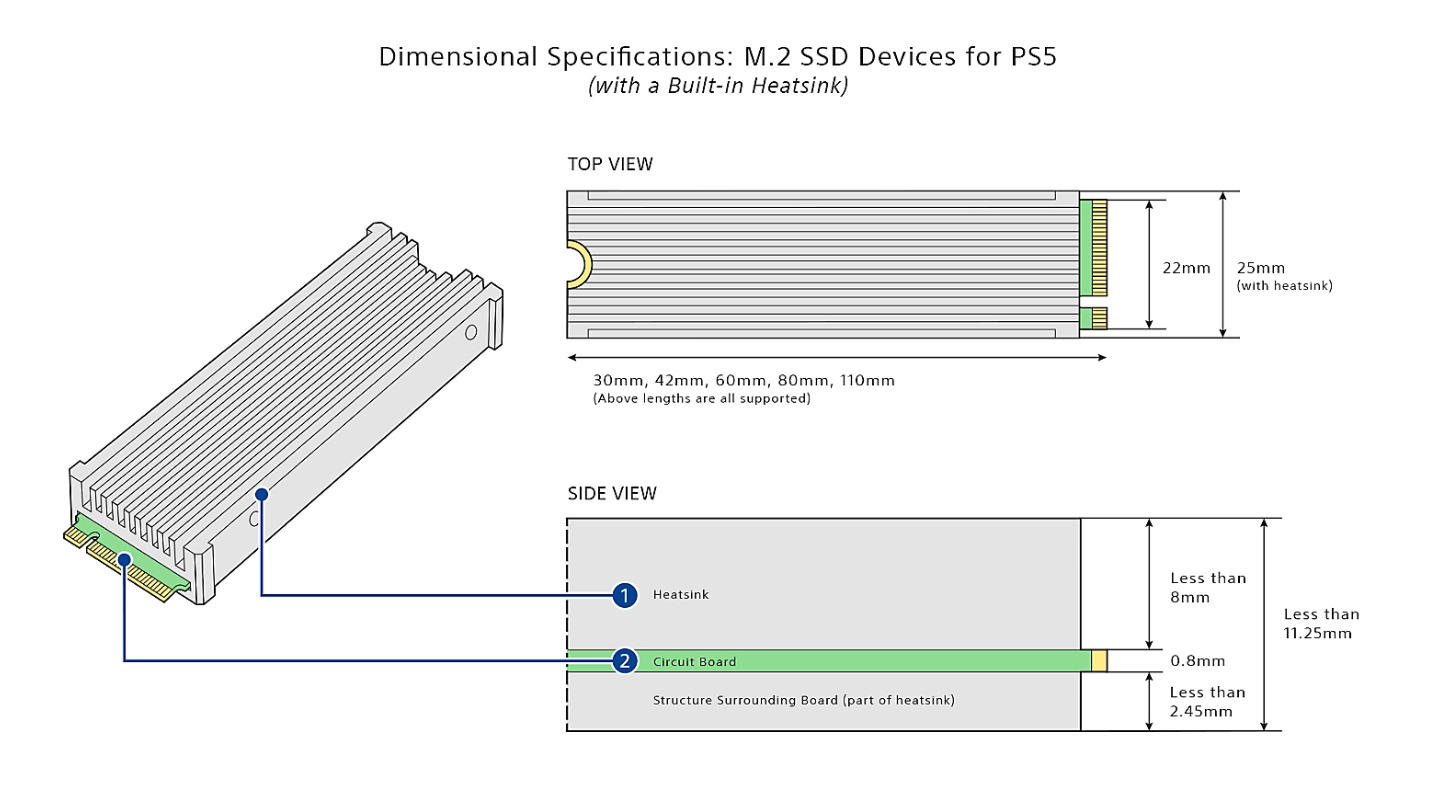
Size: Width: up to 25 mm | Length: 30/42/60/80/110 mm | Thickness: up to 11.25 mm (up to 8.0 mm from above the board, up to 2.45 mm from below the board)
The diagram below helps to visualise dimension specifications for an SSD with a built-in heatsink. You can add a single or double-sided heatsink to your SSD. If you are doing so, be sure to check out the diagram for that in Sony's official guide. You will find it under "Which M.2 SSDs can be used with a PS5 console?".
A Quick Note on Warranty
As mentioned earlier, adding an SSD won’t void your PS5 warranty as long as you follow Sony’s guidelines. That means choosing a drive that meets the official specs and installing it correctly. If something goes wrong because of an incompatible SSD or incorrect installation, that’s not covered, so double-check your drive and take your time during setup. See Sony’s official guide here.
Before You Install
- Update your PS5 system software to ensure SSD support.
- If your SSD does not include a heatsink, you will need to attach one prior to installation.
- First-time installation requires formatting the SSD, which erases all data on it, so make sure you back up anything you are not prepared to lose forever!
- Touch a grounded metal object to discharge static electricity before handling components.
- Never power on your console while the cover is off.
Your installation will depend on your PS5 model. Check the model number on the bottom of your console, which starts with CFI.
If you get stuck with any of these steps or need a visual aid, feel free to check out the official installation videos from Sony below.
CFI 1000 PS5
- Power off and unplug your PS5 and let it cool.
- Place your PS5 down on a flat surface, with the PlayStation logo facing down and the power button facing away from you. Consider placing the console on a protective covering, such as a soft cloth, to minimise the chance of scratches.
- Remove the cover panel by pulling up slightly on the bottom right corner of the console (in relation to you). Do the same on the corner that’s diagonally opposite (top left for you) and then slide the cover off by pulling it towards the bottom of the console (your left).
- Once the cover has been removed, locate the expansion slot.
- Unscrew and remove the expansion slot cover. Be careful with the screw, as you don’t want it falling into the nearby console fan.
- Once the expansion slot cover has been removed, you will see a green area with 5 expansion screw holes. Carefully remove the screw and spacer using light pressure.
- Leave the screw aside for a moment, and place the spacer in the screw hole which corresponds with the size of your M.2 SSD.
- Align your SSD with the terminal. Then, insert the SSD at an angle (diagonally). Once it's aligned with the notch in the terminal, tilt it down, and then secure it with the screw.
- Replace the expansion slot cover and side panel. To put the side panel on, simply place it so that it's just below the top of the console, and then slide it towards the top of the console. You should hear a click when it is back on.
- Reconnect cables and power on. Format the SSD when prompted.
CFI 2000 and 7000 Models
- Power off and unplug your PS5 and let it cool.
- Place your PS5 down on a flat surface, with the PlayStation logo facing down and the power button facing away from you. Consider placing the console on a protective covering, such as a soft cloth, to minimise the chance of scratches.
- Remove the triangle cover by lifting up from the top right corner (in relation to you) and then sliding it off (towards you).
- Unscrew and remove the expansion slot cover. Be careful with the screw, as you don’t want it falling into the nearby console fan.
- Remove the screw and spacer inside the expansion slot area, and then place the screw aside. Place the spacer in the expansion hole that corresponds to the size of your M.2 SSD.
- Insert the SSD diagonally into the connector, then tilt it down and secure it with the screw.
- Replace the expansion slot cover.
- The side panel cover will have 3 clips. These should correspond with holes in the console itself. Align the cover (and clips) with the holes and then press down on the top left corner (in relation to you) until you hear a click.
- Reconnect cables and power on. Follow the on-screen prompts to format the SSD.
Sony Installation Videos
(CFI-1000 model group)
(CFI-2000/7000 model group)
How to Install or Move Games to Your New M.2 SSD
To set your SSD as the default install location, simply go to Settings > Storage > Installation Location.
You can also move existing games by going to the Game Library. Select the games/data you want to move and then press the Options button, followed by Move Games and Apps.
Note: If you are using an external storage device via USB, as well as your new M.2 SSD, you will just need to click the Moveable to M.2 SSD Storage tab.
Important Notes
- Do not turn off power during formatting or data transfer.
- Never use an SSD without proper heat dissipation.
- Adding an SSD will not void your warranty if you follow Sony's guidelines.
- If you experience issues, move the game back to internal storage.
Ready to Upgrade?
Upgrading your PlayStation 5 storage does not have to be complicated. Instead of spending hours comparing specs and wondering if a drive will fit, you can shop confidently at PB Tech for compatible SSDs, complete with the mandatory heatsink for proper cooling. Sony has also made the installation process super simple, so if you’re struggling for storage at the moment, don’t stress - gaming without interruptions is well within your reach!